Setting up a Windows 10 machine to feel like working on a linux
After getting used to work with terminal command-line on linux machines, how naked do you feel without it? In this post I recollect how I setup my Windows 10 machine to get the feeling of working on a linux.
Last updated on February 3rd, 2022
Bash on Windows
First things first. You gotta run Bash commands. There are a few ways to do that like Cygwin, Git Bash, MSYS2, MobaXterm, Windows Subsystem for Linux (WSL) or running a Virtual Machine through VirtualBox. Each of them has its features and limitations. Hence, use them all for what each suits best.
I really like how MobaXterm embraces all the essential Unix tools, allows you to launch remote sessions and is able to display your remote applications. That’s my main terminal application. I use the Portable Edition extracted inside C:\Program Files (x86)\MobaXterm_Portable_v10.9 directory. More recent versions have some bugs fixed and several improvements. However, after performing my own improvements, I rather keep on the same version because some updates may cause some little misfunctions to other programs as I’ll explain further. Maybe some of the following steps won’t even be necessary in later versions. But do as you like!
Create a shortcut to the MobaXterm_Personal.exe in your taskbar so it can be easily started and always run it as an administrator so you don’t have permission issues while manipulating things around. We’re now ready to begin!
Let’s first change a few settings:
In Settings tab, click on Configuration.
In the General tab, make sure the Persistent home directory is _ProfileDir_ and the Persistent root directory is _ProfileDir_\slash.
In the Terminal tab, check the Use Windows PATH environment box.
In the Display tab, change Sidebar position to right (better for my taste). Then click Ok to close the Settings.
Now in the View tab, choosing the Compact mode option makes the window much cleaner. I would go for it!
In the Tools tab (look for the sandwich menu if you are in Compact mode), click on MobApt packages manager. That will open a list of packages you can install. Type nano in the filter box and install it then close this window.
The bash prompt appearance changes along the MobaXterm versions. Let’s create our standard. Create (or edit) the .bashrc file by typing: nano ~/.bashrc and insert on the top of the file the code below:
echo "loading bashrc file… done"

[ -z "$PS1" ] && return

export PS1='\n\[\e]0;$PWD\007\]\[\e[33m\]\D{%d-%m-%Y %H:%M.%S}\[\e[0m\] \[\e[32m\]\w\[\e[0m\]\n\[\e[36m\][\u@\h]\[\e[0m\] \$ '

alias rld='source ~/.bashrc'
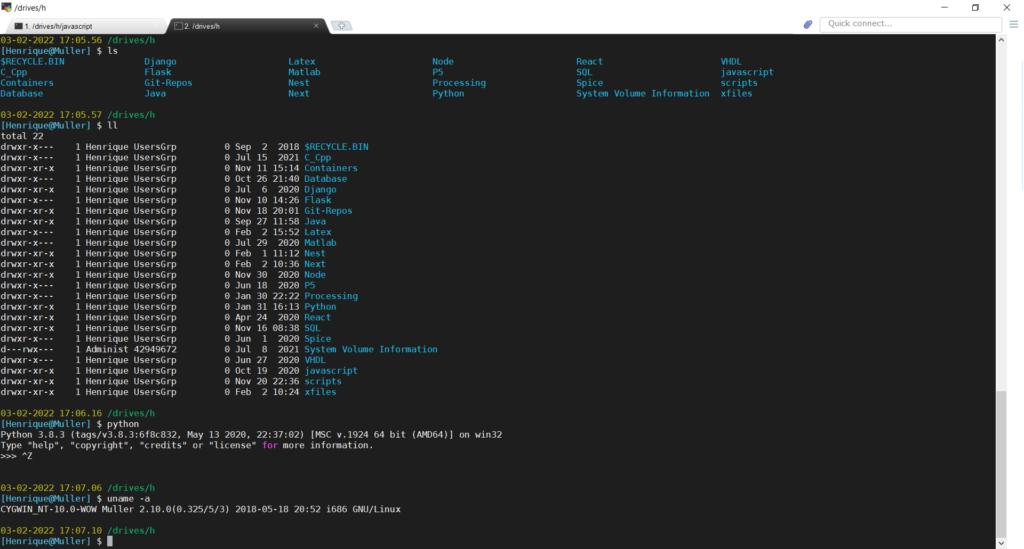
The first line is intended to help knowing when this file is being loaded by a terminal session. Also you can now type source ~/.bashrc (or rld) to reload this file without having to start a new session. Of course that’s what you have to do after saving this file. Check out how it looks now:

How about writing a bash script now? I believe a great place to put it is in /sbin folder which is empty! So, get in there: cd /sbin, then type nano script_name, and put some bash code inside. Try something like:
#!/bin/bash

echo "-------------------------------------------"
echo " Hi, $USERNAME. $(basename $0) was invoked:"
echo "-------------------------------------------"

echo " How can I help you?"
read -p " Please, type something: "
echo " $REPLY is a very important thing"
echo "-------------------------------------------"
echo " Bye! - $(date)"
echo "-------------------------------------------"

exit 0
Now type echo $PATH | grep /sbin and check if this directory is in your path. If not, we must include it. Let’s use another important file for including it. Type nano ~/.bash_profile to create (or edit) this file and add the following code:
echo "loading bash_profile file… done"

export PATH=$PATH:/sbin
Reload this file with source ~/.bash_profile and check the path again. It should be ready to be called from the terminal by typing script_name.
Package Manager for Windows
Our next step is to introduce a way to manage the packages we install in our machine. Recently, some options have come to light for Windows. Scoop, Winget and Chocolatey seem to be the most known of them. Whether each of them really is (or is not) a Package Manager is a discussion I rather not focus on. My experience with Chocolatey has been very pleasing. Had no issues while installing and uninstalling any program so far, but of course they can eventually occur. I highly recommend you to follow the official instructions and jump aboard.
Did it? Good! Now, in your MobaXterm terminal, type choco --version to verify if you’re ready to go. You can check what packages you’ve got installed by typing choco list --local-only. If you got this far, I believe you’re one of mine. Let’s get some tools!
Installing Nodejs with Chocolatey
For Warming up, type choco install nodejs to install Nodejs. It also includes the NPM package manager. It is the default package manager for JavaScript’s runtime Nodejs. Verify the installation entering node -v and npm -v. NPM can be upgraded by entering npm i npm@latest -g.
Installing a package globally can be done by typing npm install -g package_name. To list the globally installed packages, type npm list -g as below:
[Henrique@Muller] $ npm list -g
C:\Users\Henrique\AppData\Roaming\npm
├── browser-sync@2.26.7
├── create-react-app@3.4.1
├── heroku@7.16.4
├── http-server@0.12.3
├── nodemon@2.0.6
├── npm@7.11.1
├── windows-build-tools@5.2.2
└── yarn@1.22.4
Installing Python with Chocolatey
You may not have notice yet but python in not included in MobaXterm. But that’s simple as typing in your terminal choco install python --version=3.8.3 (specify the version you’d like). Still, after it’s done, typing python will return the same message as before saying: Sorry: python is not included in this version of MobaXterm. Even typing python3 will return bash: python3: command not found. You can run it by typing py -3 -i in your terminal. But we do want to feel linux right now… Edit the .bashrc file (you know how to do it):
alias python2='py -2 -i'
alias python3='py -3 -i'
That’s better. But running node nor python interpreters in the MobaXterm terminal does not work properly. Moving the arrows or backspace keys introduces errors and the command line fails. To solve that we need to use Winpty.
Installing Winpty
In order to clone this repository to your machine, you’ll need Git (also known as Git Bash, or Git For Windows). So install it by typing in your terminal choco install git. Run it and navigate to a directory of your choice. Then type git clone https://github.com/rprichard/winpty.git. You can close Git Bash. You’ll need to install Cygwin and MSYS2 as well. So, back to MobaXterm, type choco install cygwin and choco install msys2. The MSYS2 itself includes a package manager called pacman. Now all you have to do is follow the instructions in the repository page for Winpty. Use mingw64-i686-gcc-g++ as architecture. After installing and making sure you path can reach everything, open the Cygwin console, navigate to the project directory and build the winpty executable (./configure, make and make install). Be aware that, by default, winpty is installed into /usr/local. Close Cygwin. Back to the MobaXterm, add it to the PATH variable in .bash_profile file. In my case (I didn’t use chocolatey to install cygwin at that time) it is:
export PATH=$PATH:/drives/c/tools/cygwin/usr/local/binType source ~/.bash_profile to reload it and verify the installation with winpty --version.
If you successfully got winpty working, you can test the behavior typing winpty py -3 -i or winpty node. In fact, it’s time to rearrange your .bashrc file:
alias rld='source ~/.bascrc && source ~/.bash_profile'
alias python2='winpty py -2 -i'
alias python3='winpty py -3 -i'
In the code above we added winpty to the python versions aliases and improved the rld alias to reload the bash_profile file too.
Managing symbolic links in MobaXterm
MobaXterm also has the alternatives command. It is located in /usr/sbin folder, so add it to the PATH or create another alias to reach it there, like alias alternatives='/usr/sbin/alternatives' in .bashrc file.
Here is something very important to notice: For certain specific program names like python or octave, if no respective program name is located in /bin folder, it raises a message saying it’s not included in the MobaXterm version your are running. Adding a symbolic link there with that specific name solves that. But If that program is included from factory, even if you remove or modify a link, each time you start MobaXterm it will be recreated or overwritten for the factory originals. I haven’t realized a way to prevent this from happening so far. And that’s why I would rather not update the MobaXterm version unless I know it won’t affect anything I’ve got working fine already.
Let’s try it with python! Type the next command according to your version and location of the program:
alternatives --install /bin/python my_python /drives/c/python38/python.exe 99Now in /bin folder, you’ve got a symbolic link named python pointing to /etc/alternatives/my_python. Check it by getting into /etc/alternatives folder and type ll to verify there is a my_python link pointing to /drives/c/python38/python.exe. It should be working. If you type python -i (or winpty python if you’ve got winpty installed) it will launch the python interpreter into your MobaXterm terminal. To put a cherry on top, add this code below to the .bash_profile file and you’ll automatically have winpty added as a prefix to certain links inside the /bin folder.
case "$TERM" in xterm*)
  # Add programs to run with winpty
  for name in node python octave
  do
    case "$(type -l "$name" 2>/dev/null)" in
          /bin/*) continue;;
    esac
    alias $name="winpty $name"
  done
  ;;
esac
You may have two or more different versions of the same program, like most of us usually have python2.7 and python3.8, for example. You can add each of them with the same command assigning a different priority number in the end. In auto mode, the symlink will point to the highest priority number, which is the lowest integer greater than zero. Let’s do that:
alternatives --install /bin/python my_python /drives/c/python27/python.exe 1Then you can display the versions assigned to that symlink by typing alternatives --display my_python as shown below.
[Henrique@Muller] $ alternatives --display my_python
my_python - status is manual.
 link currently points to /drives/c/python38/python.exe
/drives/c/python27/python.exe - priority 1
/drives/c/python38/python.exe - priority 99
Current `best' version is /drives/c/python38/python.exe.
To change the program which provides such symlink, type alternatives --config my_python and follow the instructions.
[Henrique@Muller] $ alternatives --config my_python

There are 2 programs which provide 'my_python'.

  Selection    Command
-----------------------------------------------
   1           /drives/c/python27/python.exe
*+ 2           /drives/c/python38/python.exe

Enter to keep the current selection[+], or type selection number:
To remove a symbolic link you created this way, enter:
alternatives --remove my_python /drives/c/python38/python.exeWe already have Git Bash installed but it would be great to use Git in MobaXterm terminals as everything else. Check where it is installed and enter the command below according it’s location.
alternatives --install /bin/git my_git /drives/c/Program\ Files/Git/mingw64/bin/git.exe 99Give it a try. Type git --version.
Another thing has to be done for this to work properly. Trying to clone a repository from github should result the following error: cannot spawn ssh: No such file or directory. I solved this issue by setting the vabiable GIT_SSH to C:/tools/msys64/usr/bin/ssh.exe (In my case). We must add that to the .bash_profile file. Type nano ~/.bash_profile and add the following line:
export GIT_SSH=c:/tools/msys64/usr/bin/ssh.exeDocker on Windows 10 Home
By the time of this writing, running docker containers on Windows 10 Home Edition requires running a virtual machine. For that we’re installing VirtualBox by entering choco install virtualbox. The docker itself will be running on a virtual linux machine. On the regular Windows machine we should install a package called docker-machine. Type choco install docker-machine.
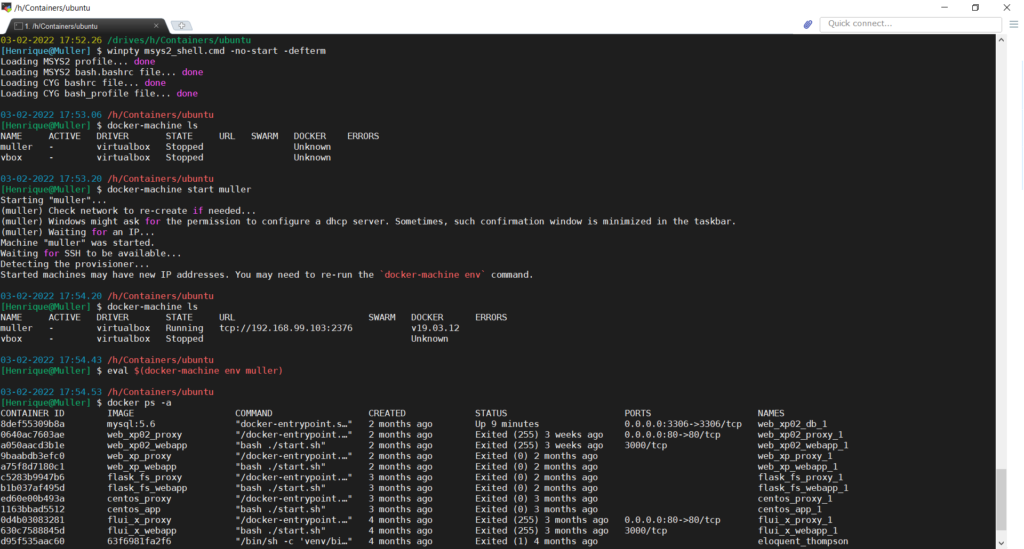
At this point, I experienced an issue apparently related to the ssh version packaged with the MobaXterm. As previously discussed, there is no way to do such update. Running the following commands on Git Bash did the job alright since it uses a different ssh version. But it would be great not having to leave MobaXterm. So we’re going to run msys2 without leaving the current terminal. Type winpty msys2_shell.cmd -no-start -defterm to start a msys2 session into the current terminal. Create an alias with a nice name for that. We’re going to run that every time we communicate with the virtual machines running docker. Be aware you may need to reload any bashrc, or bash_profile, or bash.bashrc file, etc. Every time you find files like that, put an echo stating which file it is. That’s very helpful! You can verify which system shell you’re using by entering uname -a and verify the ssh version with ssh -V. Also note you may have to copy your regular .ssh folder to the user directory of the msys system so the ssh command can reach your public key. Now we can move on.
To create a virtual machine named defaultname, type docker-machine create --driver virtualbox defaultname. You can list all your virtual machines typing docker-machine ls. Then, if not already running, docker-machine start defaultname.
While running you can access it with docker-machine ssh defaultname or, how you would normally do, by typing ssh docker@machine_ip_address. To identify the virtual machine ip address, type docker-machine ip defaultname. The authentication password is tcuser.
At this moment we have docker running on linux virtual machines where we can build images and run our containers. But our development directories and code files are on the host machine. We would appreciate if you could run docker commands on the host. First, let’s install the docker client on the host. We need to install two more packages:
choco install docker-cli
choco install docker-compose
If you type docker version, it will return the client part and an error indicating the daemon is not running. But with Docker Machine, we can point the docker client on your host to the docker daemon running inside of the virtual machine by entering:
eval $(docker-machine env defaultname)Each time we open a new terminal session it’s necessary to run that command specifying the virtual machine where the docker commands are going to be executed in. Now you can type docker version and it should return both the client and server parts.

Managing Windows Services
The Service Controller SC is a command-line utility for managing Windows services. Typing sc query type=service state=all will list all services and their respective states as follows:
SERVICE_NAME: AJRouter
DISPLAY_NAME: AllJoyn Router Service
        TYPE               : 20  WIN32_SHARE_PROCESS
        STATE              : 1  STOPPED
        WIN32_EXIT_CODE    : 1077  (0x435)
        SERVICE_EXIT_CODE  : 0  (0x0)
        CHECKPOINT         : 0x0
        WAIT_HINT          : 0x0

SERVICE_NAME: ALG
DISPLAY_NAME: Application Layer Gateway Service
        TYPE               : 10  WIN32_OWN_PROCESS
        STATE              : 1  STOPPED
        WIN32_EXIT_CODE    : 1077  (0x435)
        SERVICE_EXIT_CODE  : 0  (0x0)
        CHECKPOINT         : 0x0
        WAIT_HINT          : 0x0

SERVICE_NAME: AppIDSvc
DISPLAY_NAME: Application Identity
        TYPE               : 20  WIN32_SHARE_PROCESS
        STATE              : 1  STOPPED
        WIN32_EXIT_CODE    : 1077  (0x435)
        SERVICE_EXIT_CODE  : 0  (0x0)
        CHECKPOINT         : 0x0
        WAIT_HINT          : 0x0

SERVICE_NAME: Appinfo
DISPLAY_NAME: Application Information
        TYPE               : 30  WIN32
        STATE              : 4  RUNNING
                                (STOPPABLE, NOT_PAUSABLE, IGNORES_SHUTDOWN)
        WIN32_EXIT_CODE    : 0  (0x0)
        SERVICE_EXIT_CODE  : 0  (0x0)
        CHECKPOINT         : 0x0
        WAIT_HINT          : 0x0
.
.
.
Notice there’s both SERVICE_NAME and DISPLAY_NAME. When using the graphical user interface from services app (type services in the Windows Search tool), the list shows the display name.
Enabling OpenSSH server in Windows 10
Please refer to the official Microsoft instructions.
We can access our Windows 10 machines from other computers enabling the OpenSSH server. For checking if you need to install it you don’t even have to leave MobaXterm. Type: powershell -c "Get-WindowsCapability -Online | ? Name -like 'OpenSSH*'"
Name  : OpenSSH.Client~~~~0.0.1.0
State : Installed

Name  : OpenSSH.Server~~~~0.0.1.0
State : NotPresent
To install it, type: powershell -c "Add-WindowsCapability -Online -Name OpenSSH.Server~~~~0.0.1.0" and wait for the return:
Path          :
Online        : True
RestartNeeded : False
By default it creates the necessary firewalls rules. Let’s check it. Type powershell -c "Get-NetFirewallRule -Name ssh"
Name                  : UDP Query User{5BA40594-0DC4-43B3-B7A9-CA99DF600E0F}C:\users\henrique\slash\bin\sshd.exe
DisplayName           : sshd.exe
Description           : sshd.exe
DisplayGroup          :
Group                 :
Enabled               : True
Profile               : Public
Platform              : {}
Direction             : Inbound
Action                : Block
EdgeTraversalPolicy   : Block
LooseSourceMapping    : False
LocalOnlyMapping      : False
Owner                 :
PrimaryStatus         : OK
Status                : The rule was parsed successfully from the store. (65536)
EnforcementStatus     : NotApplicable
PolicyStoreSource     : PersistentStore
PolicyStoreSourceType : Local

Name                  : TCP Query User{F9514E8F-65D8-4CB5-B6E3-3D549830541E}C:\users\henrique\slash\bin\sshd.exe
DisplayName           : sshd.exe
Description           : sshd.exe
DisplayGroup          :
Group                 :
Enabled               : True
Profile               : Public
Platform              : {}
Direction             : Inbound
Action                : Block
EdgeTraversalPolicy   : Block
LooseSourceMapping    : False
LocalOnlyMapping      : False
Owner                 :
PrimaryStatus         : OK
Status                : The rule was parsed successfully from the store. (65536)
EnforcementStatus     : NotApplicable
PolicyStoreSource     : PersistentStore
PolicyStoreSourceType : Local

Name                  : OpenSSH-Server-In-TCP
DisplayName           : OpenSSH SSH Server (sshd)
Description           : Inbound rule for OpenSSH SSH Server (sshd)
DisplayGroup          : OpenSSH Server
Group                 : OpenSSH Server
Enabled               : True
Profile               : Any
Platform              : {}
Direction             : Inbound
Action                : Allow
EdgeTraversalPolicy   : Block
LooseSourceMapping    : False
LocalOnlyMapping      : False
Owner                 :
PrimaryStatus         : OK
Status                : The rule was parsed successfully from the store. (65536)
EnforcementStatus     : NotApplicable
PolicyStoreSource     : PersistentStore
PolicyStoreSourceType : Local
There should be a firewall rule named “OpenSSH-Server-In-TCP”, which should be enabled. If it does not exist, we can create one by entering: powershell -c "New-NetFirewallRule -Name sshd -DisplayName 'OpenSSH Server (sshd)' -Enabled True -Direction Inbound -Protocol TCP -Action Allow -LocalPort 22"
Now let’s type sc query sshd to check the sshd service status.
SERVICE_NAME: sshd
        TYPE               : 10  WIN32_OWN_PROCESS
        STATE              : 1  STOPPED
        WIN32_EXIT_CODE    : 0  (0x0)
        SERVICE_EXIT_CODE  : 0  (0x0)
        CHECKPOINT         : 0x0
        WAIT_HINT          : 0x0
Type sc start sshd to start the service. From another machine with a ssh client tool try to connect to your Windows 10 machine. When successfully connected, you’ll have access to your computer through the command prompt terminal. But wait… Type bash or msys2_shell.cmd -no-start -defterm and we’re back in the game!
That’s it! I wish I’ve made my point here and helped you in someway. Please, leave a comment below if you feel like and help me to improve this page.
Thanks for reading!
